Arduino 开发
本章节包含以下部分,请按需阅读:
Arduino 入门教程
初次接触 Arduino ESP32 开发,想要快速上手?我们为您准备了一套通用的 入门教程。
- 第0节 认识 ESP32
- 第1节 安装和配置 Arduino IDE
- 第2节 Arduino 基础知识
- 第3节 数字输出/输入
- 第4节 模拟输入
- 第5节 脉冲宽度调制 (PWM)
- 第6节 串行通信 (UART)
- 第7节 I2C 通信
- 第8节 SPI 通信
- 第9节 Wi-Fi 基础用法
- 第10节 网页服务器
- 第11节 蓝牙 (Bluetooth)
- 第12节 LVGL 图形界面开发
- 第13节 综合项目
请注意:该教程使用 ESP32-S3-Zero 作为教学示例,所有硬件代码均基于其引脚布局。在动手实践前,建议您对照手中的开发板引脚图,确认引脚配置无误。
配置开发环境
1. 安装和配置 Arduino IDE
请参考 安装和配置 Arduino IDE 教程 下载安装 Arduino IDE 并添加 ESP32 支持。
安装步骤: 安装方式请参考:Arduino 库管理教程。
2. 示例程序
Arduino 示例程序位于 示例程序包 的 Arduino 目录中。
| 示例程序 | 基础例程说明 |
|---|---|
| 01_GPIO | 控制引出 GPIO 引脚的电平状态 |
| 02_BlinkRGB | 实现控制 RGB 呈呼吸灯效果 |
| 03_GetchipID | 实现每隔三秒获取并打印 ESP32-c5 芯片的硬件信息,包括芯片型号、版本、核心数量以及芯片 ID |
| 04_BLE | 通过 ESP32-C5-Zero 开发板连接蓝牙 BLE 信标并接收广播数据的功能 |
| 05_UART | 实现通过 ESP32-C5-Zero 开发板连接 UART 功能 |
| 06_WIFI_AP | 通过 ESP32-C5-Zero 开发板设置为 AP 热点 (2.4G),允许其他 WiFi 设备接入联网 |
| 07_WIFI_STA | 实现连接指定 WiFi 并打印连接信息,并且通过连接 API 获取天气信息,且支持 WiFi 断线自动重连 |
| 08_WIFI_StaticIP | 通过 ESP32-C5-Zero 开发板使用 WIFI 连接,静态分配 IP 地址 |
01_GPIO
代码
01_GPIO.ino
void loop() {
  REG_WRITE(GPIO_OUT_REG, REG_READ(GPIO_OUT_REG) ^ gpio_low);
  REG_WRITE(GPIO_OUT1_REG, REG_READ(GPIO_OUT1_REG) ^ gpio_high);
  delay(300);
}
代码解释
REG_WRITE()配合REG_READ()对 GPIO 输出寄存器按位取反,可一次性切换多组引脚电平。delay(300)用于控制翻转节奏,让外接 LED 或示波器现象更容易观察。
02_BlinkRGB
代码
02_BlinkRGB.ino
void loop() {
  static uint8_t wheel_pos = 0;      // Current color position (0-255)
  static uint32_t last_update_ms = 0;

  const uint32_t now = millis();

  if (now - last_update_ms >= 20) {
    last_update_ms = now;

    // Calculate and set the color
    set_wheel_color(wheel_pos);

    // Increment position and wrap around at 255
    wheel_pos++;
  }
}
代码解释
set_wheel_color(wheel_pos)根据当前色轮位置计算 RGB 颜色,并写入板载灯珠。wheel_pos++持续递增颜色索引,配合 20ms 的刷新间隔形成平滑变色效果。
运行效果
 |  |  |
|---|
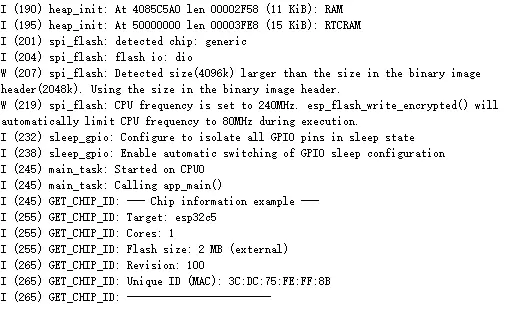
03_GetchipID
代码
03_GetchipID.ino
void loop() {
  const uint64_t mac = ESP.getEfuseMac();
  uint32_t chip_id = 0;
  for (uint8_t i = 0; i < 24; i = (uint8_t)(i + 8)) {
    chip_id |= (uint32_t)(((mac >> (40 - i)) & 0xff) << i);
  }

  Serial.printf("ESP32-C5-Zero Chip model = %s Rev %d\n", ESP.getChipModel(), ESP.getChipRevision());
  Serial.printf("This chip has %d cores\n", ESP.getChipCores());
  Serial.print("Chip ID: ");
  Serial.println(chip_id);
  delay(3000);
}
代码解释
ESP.getEfuseMac()读取芯片出厂烧录的 MAC 地址,并进一步组合成简化的chip_id。- 代码通过串口输出芯片型号、版本和核心数,便于快速确认当前板卡信息。
运行效果
 |
|---|
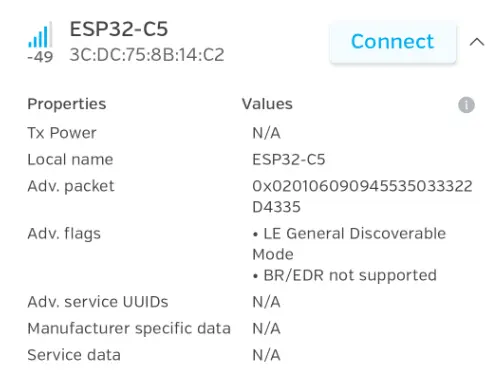
04_BLE
代码
04_BLE.ino
void setup() {
  Serial.begin(115200);

  NimBLEDevice::init("ESP32-C5-Zero");

  NimBLEAdvertising *advertising = NimBLEDevice::getAdvertising();

  NimBLEAdvertisementData scan_response;
  scan_response.setName("ESP32-C5-Zero");   // This is the name shown on the phone
  advertising->setScanResponseData(scan_response);

  const bool ok = advertising->start();
  if (ok) {
    Serial.println("BLE advertising started");
  } else {
    Serial.println("BLE advertising start failed");
  }
}
代码解释
NimBLEDevice::init()用于初始化 BLE 协议栈,并设置广播时显示的设备名。advertising->start()启动广播,手机或其他 BLE 设备即可扫描到该开发板。
运行效果
 |
|---|
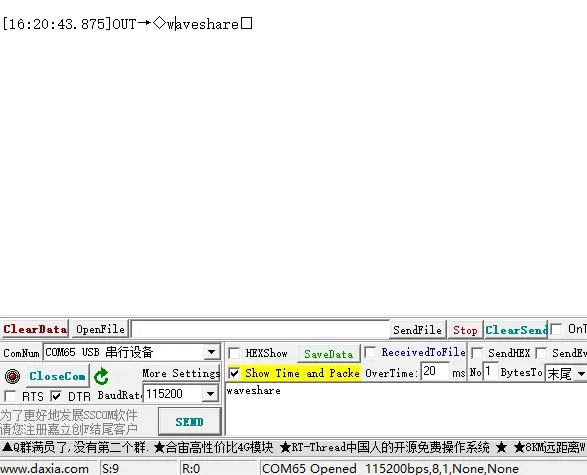
05_UART
代码
05_UART.ino
void loop() {
  while (Serial1.available() > 0) {
    Serial1.write(Serial1.read());
  }
  delay(1);
}
代码解释
Serial1.available()用于判断串口接收缓冲区中是否有新数据。- 读到的数据立即通过
Serial1.write()回发,实现最基础的串口回环测试。
运行效果
 |
|---|
06_WIFI_AP
代码
06_WIFI_AP.ino
void setup() {
  Serial.begin(115200);

  // Best practice: Register the event handler BEFORE starting the AP
  // so you don't miss any immediate connection events.
  WiFi.onEvent(on_wifi_event);

  // Start the Access Point
  Serial.println("Starting WiFi Access Point...");
  if (!WiFi.softAP(ssid, password)) {
    Serial.println("Failed to start WiFi AP! Halting system.");
    while (true); // Halt if AP fails to start
  }

  Serial.println("WiFi Access Point initialized successfully!");
  Serial.print("AP SSID: ");
  Serial.println(ssid);
  Serial.print("AP IP Address: ");
  Serial.println(WiFi.softAPIP()); // Also print the AP's own IP address
}
代码解释
WiFi.softAP(ssid, password)负责启动热点模式,让开发板作为一个 Wi-Fi 接入点工作。WiFi.softAPIP()可读取热点的本机地址,方便后续让手机或电脑连接测试。
运行效果
 |
|---|
07_WIFI_STA
代码
07_WIFI_STA.ino
void setup() {
  // Initialize serial communication
  Serial.begin(115200);
  while (!Serial);  // Wait for serial port to connect

  // Connect to WiFi
  Serial.println("Connecting to WiFi...");
  WiFi.begin(ssid, password);

  // Wait for WiFi connection
  while (WiFi.status() != WL_CONNECTED) {
    delay(500);
    Serial.print(".");
  }

  // Print connection success message with WiFi details
  Serial.println("\n");
  Serial.println("=====================================");
  Serial.println("WiFi connection successful!");
  Serial.print("Connected to SSID: ");
  Serial.println(ssid);
  Serial.print("With password: ");
  Serial.println(password);
  Serial.print("Assigned IP address: ");
  Serial.println(WiFi.localIP());
  Serial.println("=====================================\n");
}
代码解释
WiFi.begin(ssid, password)用于连接指定路由器,后面的循环持续检查连接状态。- 连接成功后通过
WiFi.localIP()输出分配到的 IP,方便确认联网是否正常。
运行效果
 |
|---|
08_WIFI_StaticIP
代码
08_WIFI_StaticIP.ino
void loop() {
  static uint32_t last_check_ms = 0;
  const uint32_t now = millis();
  if ((uint32_t)(now - last_check_ms) < 5000) {
    delay(10);
    return;
  }
  last_check_ms = now;

  // Periodically check Wi-Fi connection and auto-reconnect
  if (WiFi.status() != WL_CONNECTED) {
    Serial.println("Wi-Fi disconnected, attempting reconnection...");
    WiFi.begin(ssid, password); // Re-initiate connection
    uint8_t retry = 0;
    uint32_t retry_start_ms = millis();
    uint32_t retry_dot_ms = retry_start_ms;
    while (WiFi.status() != WL_CONNECTED && retry < 5) {
      const uint32_t now2 = millis();
      if ((uint32_t)(now2 - retry_dot_ms) >= 1000) {
        retry_dot_ms = now2;
        Serial.print('.');
        retry++;
      }
      delay(10);
    }
    if (WiFi.status() == WL_CONNECTED) {
      Serial.println("\nReconnected to Wi-Fi!");
      Serial.print("Current IP: ");
      Serial.println(WiFi.localIP());
    }
  }
  delay(10);
}
代码解释
- 这段代码每隔 5 秒检查一次联网状态,避免在主循环中频繁重连。
- 当 Wi-Fi 断开时会重新调用
WiFi.begin()发起连接,并在成功后打印当前 IP 信息。