Arduino 开发
本章节包含以下部分,请按需阅读:
Arduino 入门教程
初次接触 Arduino ESP32 开发,想要快速上手?我们为您准备了一套通用的 入门教程。
- 第0节 认识 ESP32
- 第1节 安装和配置 Arduino IDE
- 第2节 Arduino 基础知识
- 第3节 数字输出/输入
- 第4节 模拟输入
- 第5节 脉冲宽度调制 (PWM)
- 第6节 串行通信 (UART)
- 第7节 I2C 通信
- 第8节 SPI 通信
- 第9节 Wi-Fi 基础用法
- 第10节 网页服务器
- 第11节 蓝牙 (Bluetooth)
- 第12节 LVGL 图形界面开发
- 第13节 综合项目
请注意:该教程使用 ESP32-S3-Zero 作为教学示例,所有硬件代码均基于其引脚布局。在动手实践前,建议您对照手中的开发板引脚图,确认引脚配置无误。
配置开发环境
1. 安装和配置 Arduino IDE
请参考 安装和配置 Arduino IDE 教程 下载安装 Arduino IDE 并添加 ESP32 支持。
2. 安装库
要运行示例,需要安装对应的库。示例代码使用 GFX Library for Arduino 库驱动 ST7789 显示屏
,并使用 SensorLib 库驱动 CST816 触摸芯片。
可从 此链接 下载 ESP32-S3-Touch-LCD-1.54 开发板的示例程序包。包内的 Arduino\libraries 目录已包含本教程所需的全部库文件。
| 库或文件名称 | 说明 | 版本 | 安装方式 |
|---|---|---|---|
| lvgl | LVGL 图形化库 | v8.4.0 或 v9.3.0 | 通过库管理器或手动安装 |
| GFX_Library_for_Arduino | GFX 图形化库 | v1.6.0 | 通过库管理器或手动安装 |
| U8g2 | 图形显示库 | v2.35.30 | 通过库管理器或手动安装 |
| SensorLib | 传感器驱动库 | v0.3.1 | 通过库管理器或手动安装 |
| ESP32-audioI2S-master | 音频处理库 | v3.4.0 | 通过库管理器或手动安装 |
| OneButton | 按键库 | v2.6.1 | 通过库管理器或手动安装 |
LVGL 及其驱动库的版本之间存在较强的依赖关系。例如,为 LVGL v8 编写的驱动可能不兼容 LVGL v9。为确保示例能够稳定复现,推荐使用上表列出的特定版本。混合使用不同版本的库可能导致编译失败或运行时异常。
安装步骤:
-
解压已下载的 示例程序包。
-
将其
Arduino\libraries目录下的所有文件夹(ESP32-audioI2S-master 、GFX_Library_for_Arduino 等)复制到 Arduino 的库文件夹中。信息Arduino 库文件夹的路径通常是:
c:\Users\<用户名>\Documents\Arduino\libraries。也可以在 Arduino IDE 中通过 文件 > 首选项,查看“项目文件夹位置”来定位。库文件夹就是此路径下的
libraries文件夹。 -
其他安装方式请参考:Arduino 库管理教程。
ESP32-S3-Touch-LCD-1.54 所需开发板安装说明
| 板名称 | 板安装要求 | 版本号要求 |
|---|---|---|
| ESP32 by Espressif Systems | “离线”安装/“在线”安装 | 3.2.0 |
3. 其他提示
ESP32-S3-Touch-LCD-1.54 需要选择及配置开发板。
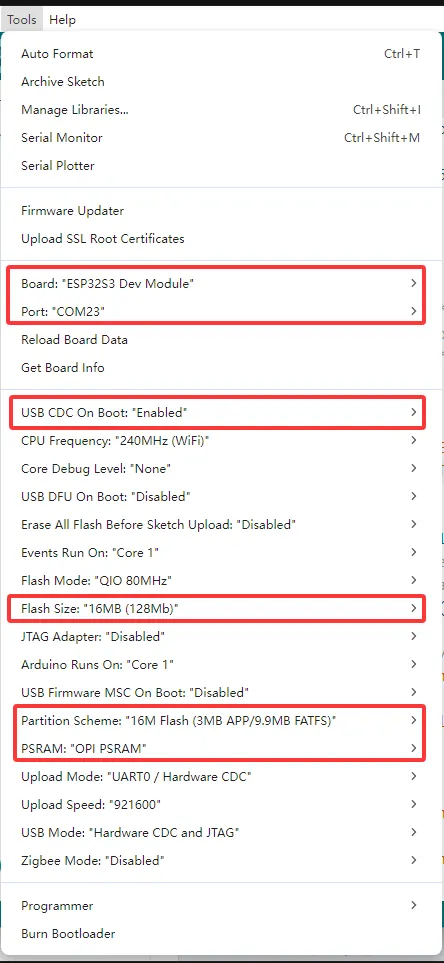
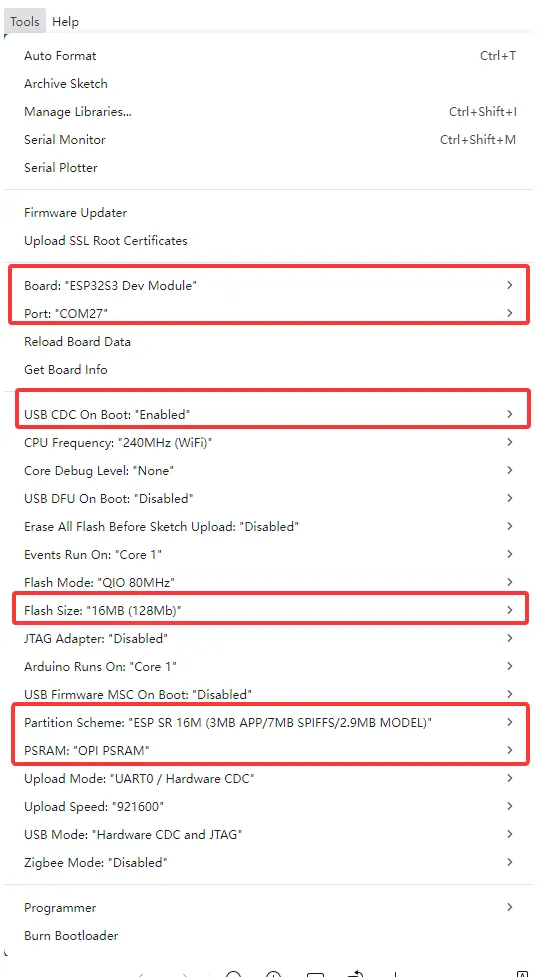
- ESP32-S3-Touch-LCD-1.54 需要选择 ESP32S3 Dev Module。
- 选择 USB 端口
- ESP32-S3-Touch-LCD-1.54 使用 ESP32-S3 原生 USB 接口,而非 UART 转 USB。对于串口通信:
-
printf()函数可直接使用; -
若要使用
Serial.println()函数,需要额外配置:在 IDE 工具菜单中启用"USB CDC On Boot"选项,或在代码中声明 HWCDC 对象处理 USB 串口通信。
-
- 选择 16MB flash
- 选择合适大小的分区表
示例程序
Arduino 示例程序位于 示例程序包 的 Arduino/examples 目录中。
| 示例程序 | 基础例程说明 | 依赖库 |
|---|---|---|
| 01_audio_out | 读取 SD 卡的音频文件,并播放 | ESP32-audioI2S-master |
| 02_button_example | 按键测试 | OneButton |
| 03_qmi8658_example | 打印 IMU 获取的数据 | SensorLib FastLED |
| 04_gfx_helloworld | 屏幕上显示 HelloWorld | GFX_Library_for_Arduino |
| 05_esp_wifi_analyzer | 屏幕上显示 WiFi 信号强度 | GFX_Library_for_Arduino |
| 06_gfx_u8g2_font | 通过加载字库,实现各国文字显示 | GFX_Library_for_Arduino、U8g2 |
| 07_sd_card_test | 测试 SD 卡的读写 | --- |
| 08_lvgl_example_v8 | lvgl v8.4.0 示例程序 | GFX_Library_for_Arduino、lvgl |
| 09_lvgl_example_v9 | lvgl v9.3.0 示例程序 | GFX_Library_for_Arduino、lvgl |
| 10_esp_sr | 测试语音唤醒、语音识别 | --- |
01_audio_out
本示例演示 ESP32-S3-Touch-LCD-1.54 读取 SD 卡的音频文件并使用喇叭播放,屏幕无现象,支持 MP3、AAC、WAV 等格式。
代码
01_audio_out.ino
#include "Arduino.h"
#include "WiFiMulti.h"
#include "Audio.h"
#include "SD_MMC.h"
#include "FS.h"

#include "es8311.h"
#include "esp_check.h"
#include "Wire.h"

#define PA_CTRL 7
#define I2S_MCLK 8
#define I2S_BCLK 9
#define I2S_DOUT 12
#define I2S_LRC 10

#define I2C_SDA 42
#define I2C_SCL 41

#define EXAMPLE_SAMPLE_RATE (16000)
#define EXAMPLE_MCLK_MULTIPLE (256)  // If not using 24-bit data width, 256 should be enough
#define EXAMPLE_MCLK_FREQ_HZ (EXAMPLE_SAMPLE_RATE * EXAMPLE_MCLK_MULTIPLE)
#define EXAMPLE_VOICE_VOLUME (75)

Audio audio;
WiFiMulti wifiMulti;
// #define ENABLE_WIFI
String ssid = "waveshare";
String password = "12345678";

int clk = 16;
int cmd = 15;
int d0 = 17;
int d1 = 18;
int d2 = 13;
int d3 = 14;

static esp_err_t es8311_codec_init(void) {

  es8311_handle_t es_handle = es8311_create(I2C_NUM_0, ES8311_ADDRRES_0);
  ESP_RETURN_ON_FALSE(es_handle, ESP_FAIL, TAG, "es8311 create failed");
  const es8311_clock_config_t es_clk = {
    .mclk_inverted = false,
    .sclk_inverted = false,
    .mclk_from_mclk_pin = true,
    .mclk_frequency = EXAMPLE_MCLK_FREQ_HZ,
    .sample_frequency = EXAMPLE_SAMPLE_RATE
  };

  ESP_ERROR_CHECK(es8311_init(es_handle, &es_clk, ES8311_RESOLUTION_16, ES8311_RESOLUTION_16));
  ESP_RETURN_ON_ERROR(es8311_sample_frequency_config(es_handle, EXAMPLE_SAMPLE_RATE * EXAMPLE_MCLK_MULTIPLE, EXAMPLE_SAMPLE_RATE), TAG, "set es8311 sample frequency failed");
  ESP_RETURN_ON_ERROR(es8311_voice_volume_set(es_handle, EXAMPLE_VOICE_VOLUME, NULL), TAG, "set es8311 volume failed");
  ESP_RETURN_ON_ERROR(es8311_microphone_config(es_handle, false), TAG, "set es8311 microphone failed");

  return ESP_OK;
}

void setup() {
  Serial.begin(115200);
  Wire.begin(I2C_SDA, I2C_SCL);
  pinMode(PA_CTRL, OUTPUT);
  digitalWrite(PA_CTRL, HIGH);
  es8311_codec_init();
  if (!SD_MMC.setPins(clk, cmd, d0, d1, d2, d3)) {
    Serial.println("Pin change failed!");
    return;
  }
  if (!SD_MMC.begin()) {
    Serial.println("Card Mount Failed");
    return;
  }
#ifdef ENABLE_WIFI
  WiFi.mode(WIFI_STA);
  wifiMulti.addAP(ssid.c_str(), password.c_str());
  wifiMulti.run();
  if (WiFi.status() != WL_CONNECTED) {
    WiFi.disconnect(true);
    wifiMulti.run();
  }
#endif
  audio.setPinout(I2S_BCLK, I2S_LRC, I2S_DOUT, I2S_MCLK);
  audio.setVolume(21);  // 0...21

#ifdef ENABLE_WIFI
  //  audio.connecttohost("http://www.wdr.de/wdrlive/media/einslive.m3u");
  //  audio.connecttohost("http://somafm.com/wma128/missioncontrol.asx"); //  asx
  //  audio.connecttohost("http://mp3.ffh.de/radioffh/hqlivestream.aac"); //  128k aac
  //  audio.connecttohost("http://mp3.ffh.de/radioffh/hqlivestream.mp3"); //  128k mp3
#else
  audio.connecttoFS(SD_MMC, "music/1.mp3");
#endif
}

void loop() {
  vTaskDelay(1);
  audio.loop();
  if (Serial.available()) {  // put streamURL in serial monitor
    audio.stopSong();
    String r = Serial.readString();
    r.trim();
    if (r.length() > 5) audio.connecttohost(r.c_str());
    log_i("free heap=%i", ESP.getFreeHeap());
  }
}

// optional
void audio_info(const char *info) {
  Serial.print("info        ");
  Serial.println(info);
}
void audio_id3data(const char *info) {  //id3 metadata
  Serial.print("id3data     ");
  Serial.println(info);
}
void audio_eof_mp3(const char *info) {  //end of file
  Serial.print("eof_mp3     ");
  Serial.println(info);
}
void audio_showstation(const char *info) {
  Serial.print("station     ");
  Serial.println(info);
}
void audio_showstreamtitle(const char *info) {
  Serial.print("streamtitle ");
  Serial.println(info);
}
void audio_bitrate(const char *info) {
  Serial.print("bitrate     ");
  Serial.println(info);
}
void audio_commercial(const char *info) {  //duration in sec
  Serial.print("commercial  ");
  Serial.println(info);
}
void audio_icyurl(const char *info) {  //homepage
  Serial.print("icyurl      ");
  Serial.println(info);
}
void audio_lasthost(const char *info) {  //stream URL played
  Serial.print("lasthost    ");
  Serial.println(info);
}
代码解释
-
初始化 SD 卡:
if (!SD_MMC.setPins(clk, cmd, d0, d1, d2, d3)) {Serial.println("Pin change failed!");return;}if (!SD_MMC.begin()) {Serial.println("Card Mount Failed");return;} -
设置 I2S 引脚和音量大小:
audio.setPinout(I2S_BCLK, I2S_LRC, I2S_DOUT, I2S_MCLK);audio.setVolume(21); // 0...21 -
设置播放的音频文件:
audio.connecttoFS(SD_MMC, "music/1.mp3");
运行效果
- 播放音频文件,屏幕无现象
02_button_example
- 本示例演示如何使用 OneButton 库读取按键的单击、双击和长按等状态,并通过串口打印。
代码
02_button_example.ino
#include "OneButton.h"
#define PIN_INPUT1 0
#define PIN_INPUT2 5
#define PIN_INPUT3 4
// Setup a new OneButton on pin PIN_INPUT1.
OneButton button1(PIN_INPUT1, true);
// Setup a new OneButton on pin PIN_INPUT2.
OneButton button2(PIN_INPUT2, true);
// Setup a new OneButton on pin PIN_INPUT3.
OneButton button3(PIN_INPUT3, true);
// setup code here, to run once:
void setup() {
// Setup the Serial port. see https://docs.arduino.cc/language-reference/en/functions/communication/serial/ifSerial/
Serial.begin(115200);
while (!Serial) {
; // wait for serial port to connect. Needed for Leonardo only
}
// link the button 1 functions.
button1.attachClick(click1);
button1.attachDoubleClick(doubleclick1);
button1.attachLongPressStart(longPressStart1);
button1.attachLongPressStop(longPressStop1);
button1.attachDuringLongPress(longPress1);
// link the button 2 functions.
button2.attachClick(click2);
button2.attachDoubleClick(doubleclick2);
button2.attachLongPressStart(longPressStart2);
button2.attachLongPressStop(longPressStop2);
button2.attachDuringLongPress(longPress2);
// link the button 3 functions.
button3.attachClick(click3);
button3.attachDoubleClick(doubleclick3);
button3.attachLongPressStart(longPressStart3);
button3.attachLongPressStop(longPressStop3);
button3.attachDuringLongPress(longPress3);
} // setup
// main code here, to run repeatedly:
void loop() {
// keep watching the push buttons:
button1.tick();
button2.tick();
button3.tick();
// You can implement other code in here or just wait a while
delay(10);
} // loop
// ----- button 1 callback functions
// This function will be called when the button1 was pressed 1 time (and no 2. button press followed).
void click1() {
Serial.println("Button 1 click.");
} // click1
// This function will be called when the button1 was pressed 2 times in a short timeframe.
void doubleclick1() {
Serial.println("Button 1 doubleclick.");
} // doubleclick1
// This function will be called once, when the button1 is pressed for a long time.
void longPressStart1() {
Serial.println("Button 1 longPress start");
} // longPressStart1
// This function will be called often, while the button1 is pressed for a long time.
void longPress1() {
Serial.println("Button 1 longPress...");
} // longPress1
// This function will be called once, when the button1 is released after beeing pressed for a long time.
void longPressStop1() {
Serial.println("Button 1 longPress stop");
} // longPressStop1
// ... and the same for button 2:
void click2() {
Serial.println("Button 2 click.");
} // click2
void doubleclick2() {
Serial.println("Button 2 doubleclick.");
} // doubleclick2
void longPressStart2() {
Serial.println("Button 2 longPress start");
} // longPressStart2
void longPress2() {
Serial.println("Button 2 longPress...");
} // longPress2
void longPressStop2() {
Serial.println("Button 2 longPress stop");
} // longPressStop2
// ... and the same for button 3:
void click3() {
Serial.println("Button 3 click.");
} // click3
void doubleclick3() {
Serial.println("Button 3 doubleclick.");
} // doubleclick3
void longPressStart3() {
Serial.println("Button 3 longPress start");
} // longPressStart3
void longPress3() {
Serial.println("Button 3 longPress...");
} // longPress3
void longPressStop3() {
Serial.println("Button 3 longPress stop");
} // longPressStop3
// End
代码解释
-
绑定回调函数:
button1.attachClick(click1);button1.attachDoubleClick(doubleclick1);button1.attachLongPressStart(longPressStart1);button1.attachLongPressStop(longPressStop1);button1.attachDuringLongPress(longPress1);
运行效果
- 屏幕无现象
- 串口打印按钮信息

03_qmi8658_example
- 本示例使用 ESP32-S3-LCD-1.54 获取板载 QMI8658 的数据并使用串口打印
代码
03_qmi8658_example.ino
#include <Arduino.h>
#include <Wire.h>
#include <SPI.h>
#include "SensorQMI8658.hpp"
#ifndef SENSOR_SDA
#define SENSOR_SDA 8
#endif
#ifndef SENSOR_SCL
#define SENSOR_SCL 7
#endif
#ifndef SENSOR_IRQ
#define SENSOR_IRQ 10
#endif
SensorQMI8658 qmi;
IMUdata acc;
IMUdata gyr;
void setup()
{
Serial.begin(115200);
while (!Serial);
#if IMU_INT > 0
qmi.setPins(IMU_INT);
#endif
//Using WIRE !!
if (!qmi.begin(Wire, QMI8658_L_SLAVE_ADDRESS, SENSOR_SDA, SENSOR_SCL)) {
Serial.println("Failed to find QMI8658 - check your wiring!");
while (1) {
delay(1000);
}
}
/* Get chip id*/
Serial.print("Device ID:");
Serial.println(qmi.getChipID(), HEX);
if (qmi.selfTestAccel()) {
Serial.println("Accelerometer self-test successful");
} else {
Serial.println("Accelerometer self-test failed!");
}
if (qmi.selfTestGyro()) {
Serial.println("Gyroscope self-test successful");
} else {
Serial.println("Gyroscope self-test failed!");
}
qmi.configAccelerometer(
/*
* ACC_RANGE_2G
* ACC_RANGE_4G
* ACC_RANGE_8G
* ACC_RANGE_16G
* */
SensorQMI8658::ACC_RANGE_4G,
/*
* ACC_ODR_1000H
* ACC_ODR_500Hz
* ACC_ODR_250Hz
* ACC_ODR_125Hz
* ACC_ODR_62_5Hz
* ACC_ODR_31_25Hz
* ACC_ODR_LOWPOWER_128Hz
* ACC_ODR_LOWPOWER_21Hz
* ACC_ODR_LOWPOWER_11Hz
* ACC_ODR_LOWPOWER_3H
* */
SensorQMI8658::ACC_ODR_1000Hz,
/*
* LPF_MODE_0 //2.66% of ODR
* LPF_MODE_1 //3.63% of ODR
* LPF_MODE_2 //5.39% of ODR
* LPF_MODE_3 //13.37% of ODR
* LPF_OFF // OFF Low-Pass Fitter
* */
SensorQMI8658::LPF_MODE_0);
qmi.configGyroscope(
/*
* GYR_RANGE_16DPS
* GYR_RANGE_32DPS
* GYR_RANGE_64DPS
* GYR_RANGE_128DPS
* GYR_RANGE_256DPS
* GYR_RANGE_512DPS
* GYR_RANGE_1024DPS
* */
SensorQMI8658::GYR_RANGE_64DPS,
/*
* GYR_ODR_7174_4Hz
* GYR_ODR_3587_2Hz
* GYR_ODR_1793_6Hz
* GYR_ODR_896_8Hz
* GYR_ODR_448_4Hz
* GYR_ODR_224_2Hz
* GYR_ODR_112_1Hz
* GYR_ODR_56_05Hz
* GYR_ODR_28_025H
* */
SensorQMI8658::GYR_ODR_896_8Hz,
/*
* LPF_MODE_0 //2.66% of ODR
* LPF_MODE_1 //3.63% of ODR
* LPF_MODE_2 //5.39% of ODR
* LPF_MODE_3 //13.37% of ODR
* LPF_OFF // OFF Low-Pass Fitter
* */
SensorQMI8658::LPF_MODE_3);
/*
* If both the accelerometer and gyroscope sensors are turned on at the same time,
* the output frequency will be based on the gyroscope output frequency.
* The example configuration is 896.8HZ output frequency,
* so the acceleration output frequency is also limited to 896.8HZ
* */
qmi.enableGyroscope();
qmi.enableAccelerometer();
// Print register configuration information
qmi.dumpCtrlRegister();
#if IMU_INT > 0
// If you want to enable interrupts, then turn on the interrupt enable
qmi.enableINT(SensorQMI8658::INTERRUPT_PIN_1, true);
qmi.enableINT(SensorQMI8658::INTERRUPT_PIN_2, false);
#endif
Serial.println("Read data now...");
}
void loop()
{
// When the interrupt pin is passed in through setPin,
// the GPIO will be read to see if the data is ready.
if (qmi.getDataReady()) {
// Serial.print("Timestamp:");
// Serial.print(qmi.getTimestamp());
if (qmi.getAccelerometer(acc.x, acc.y, acc.z)) {
// Print to serial plotter
Serial.print("ACCEL.x:"); Serial.print(acc.x); Serial.print(",");
Serial.print("ACCEL.y:"); Serial.print(acc.y); Serial.print(",");
Serial.print("ACCEL.z:"); Serial.print(acc.z); Serial.println();
/*
m2/s to mg
Serial.print(" ACCEL.x:"); Serial.print(acc.x * 1000); Serial.println(" mg");
Serial.print(",ACCEL.y:"); Serial.print(acc.y * 1000); Serial.println(" mg");
Serial.print(",ACCEL.z:"); Serial.print(acc.z * 1000); Serial.println(" mg");
*/
}
if (qmi.getGyroscope(gyr.x, gyr.y, gyr.z)) {
// Print to serial plotter
Serial.print("GYRO.x:"); Serial.print(gyr.x); Serial.print(",");
Serial.print("GYRO.y:"); Serial.print(gyr.y); Serial.print(",");
Serial.print("GYRO.z:"); Serial.print(gyr.z); Serial.println();
// Serial.print(" GYRO.x:"); Serial.print(gyr.x); Serial.println(" degrees/sec");
// Serial.print(",GYRO.y:"); Serial.print(gyr.y); Serial.println(" degrees/sec");
// Serial.print(",GYRO.z:"); Serial.print(gyr.z); Serial.println(" degrees/sec");
}
// Serial.print("Temperature:");
// Serial.print(qmi.getTemperature_C());
// Serial.println(" degrees C");
}
delay(100);
}
代码解释
-
初始化 QMI8658:
if (!qmi.begin(Wire, QMI8658_L_SLAVE_ADDRESS, SENSOR_SDA, SENSOR_SCL)) {Serial.println("Failed to find QMI8658 - check your wiring!");while (1) {delay(1000);}}
运行效果
- 屏幕无现象
- 打开串口监视器,可以看到打印的 x、y、z 轴的 accel 和 gyro 数据

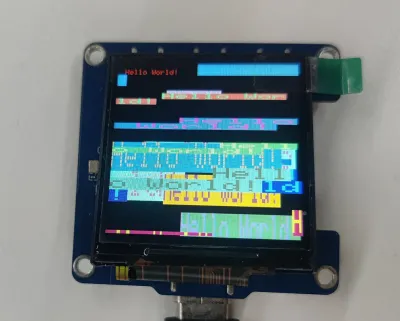
04_gfx_helloworld
- 本示例演示 ESP32-S3-Touch-LCD-1.54 使用 GFX_Library_for_Arduino 库驱动屏幕并在屏幕上显示 HelloWorld
代码
04_gfx_helloworld.ino
#include <Arduino_GFX_Library.h>
#define GFX_BL 46 // default backlight pin, you may replace DF_GFX_BL to actual backlight pin
/* More data bus class: https://github.com/moononournation/Arduino_GFX/wiki/Data-Bus-Class */
Arduino_DataBus* bus = new Arduino_ESP32SPI(45 /* DC */, 21 /* CS */, 38 /* SCK */, 39 /* MOSI */, -1 /* MISO */);
Arduino_GFX* gfx = new Arduino_ST7789(
bus, 40 /* RST */, 0 /* rotation */, true, 240, 240);
/*******************************************************************************
* End of Arduino_GFX setting
******************************************************************************/
void setup(void)
{
#ifdef DEV_DEVICE_INIT
DEV_DEVICE_INIT();
#endif
Serial.begin(115200);
// Serial.setDebugOutput(true);
// while(!Serial);
Serial.println("Arduino_GFX Hello World example");
// Init Display
if (!gfx->begin())
{
Serial.println("gfx->begin() failed!");
}
#ifdef GFX_BL
pinMode(GFX_BL, OUTPUT);
digitalWrite(GFX_BL, HIGH);
#endif
gfx->fillScreen(RGB565_RED);
delay(1000);
gfx->fillScreen(RGB565_BLUE);
delay(1000);
gfx->fillScreen(RGB565_GREEN);
delay(1000);
gfx->fillScreen(RGB565_BLACK);
gfx->setCursor(10, 10);
gfx->setTextColor(RGB565_RED);
gfx->println("Hello World!");
delay(5000); // 5 seconds
}
void loop()
{
gfx->setCursor(random(gfx->width()), random(gfx->height()));
gfx->setTextColor(random(0xffff), random(0xffff));
gfx->setTextSize(random(6) /* x scale */, random(6) /* y scale */, random(2) /* pixel_margin */);
gfx->println("Hello World!");
delay(1000); // 1 second
}
代码解释
-
配置屏幕接口、分辨率等
Arduino_DataBus* bus = new Arduino_ESP32SPI(45 /* DC */, 21 /* CS */, 38 /* SCK */, 39 /* MOSI */, -1 /* MISO */);Arduino_GFX* gfx = new Arduino_ST7789(bus, 40 /* RST */, 0 /* rotation */, true, 240, 240);
运行效果
- 屏幕显示
05_esp_wifi_analyzer
- 本示例演示 ESP32-S3-Touch-LCD-1.54 使用 GFX_Library_for_Arduino 库显示 WiFi 频段信号强度
代码
05_esp_wifi_analyzer.ino
/*
* ESP WiFi Analyzer
* Require ESP8266/ESP32 board support.
*/
// POWER SAVING SETTING
#define SCAN_INTERVAL 3000
// #define SCAN_COUNT_SLEEP 3
// #define LCD_PWR_PIN 14
#include <Arduino_GFX_Library.h>
#define GFX_BL 46 // default backlight pin, you may replace DF_GFX_BL to actual backlight pin
/* More dev device declaration: https://github.com/moononournation/Arduino_GFX/wiki/Dev-Device-Declaration */
Arduino_DataBus* bus = new Arduino_ESP32SPI(45 /* DC */, 21 /* CS */, 38 /* SCK */, 39 /* MOSI */, -1 /* MISO */);
Arduino_GFX* gfx = new Arduino_ST7789(
bus, 40 /* RST */, 0 /* rotation */, true, 240, 240);
/*******************************************************************************
* End of Arduino_GFX setting
******************************************************************************/
#if defined(ESP32)
#include "WiFi.h"
#else
#include "ESP8266WiFi.h"
#define log_i(format, ...) Serial.printf(format, ##__VA_ARGS__)
#endif
int16_t w, h, text_size, banner_height, graph_baseline, graph_height, channel_width, signal_width;
// RSSI RANGE
#define RSSI_CEILING -40
#define RSSI_FLOOR -100
// Channel color mapping from channel 1 to 14
uint16_t channel_color[] = {
RGB565_RED, RGB565_ORANGE, RGB565_YELLOW, RGB565_GREEN, RGB565_CYAN, RGB565_BLUE, RGB565_MAGENTA,
RGB565_RED, RGB565_ORANGE, RGB565_YELLOW, RGB565_GREEN, RGB565_CYAN, RGB565_BLUE, RGB565_MAGENTA};
uint8_t scan_count = 0;
void setup()
{
#ifdef DEV_DEVICE_INIT
DEV_DEVICE_INIT();
#endif
Serial.begin(115200);
// Serial.setDebugOutput(true);
// while(!Serial);
Serial.println("Arduino_GFX ESP WiFi Analyzer example");
// Set WiFi to station mode and disconnect from an AP if it was previously connected
WiFi.mode(WIFI_STA);
WiFi.disconnect();
delay(100);
#if defined(LCD_PWR_PIN)
pinMode(LCD_PWR_PIN, OUTPUT); // sets the pin as output
digitalWrite(LCD_PWR_PIN, HIGH); // power on
#endif
#ifdef GFX_BL
pinMode(GFX_BL, OUTPUT);
digitalWrite(GFX_BL, HIGH);
#endif
// Init Display
if (!gfx->begin())
{
Serial.println("gfx->begin() failed!");
}
w = gfx->width();
h = gfx->height();
text_size = (h < 200) ? 1 : 2;
banner_height = text_size * 3 * 4;
graph_baseline = h - 20; // minus 2 text lines
graph_height = graph_baseline - banner_height - 30; // minus 3 text lines
channel_width = w / 17;
signal_width = channel_width * 2;
// init banner
gfx->setTextSize(text_size);
gfx->fillScreen(RGB565_BLACK);
gfx->setTextColor(RGB565_RED);
gfx->setCursor(0, 0);
gfx->print("ESP");
gfx->setTextColor(RGB565_WHITE);
gfx->print(" WiFi Analyzer");
#ifdef CANVAS
gfx->flush();
#endif
}
bool matchBssidPrefix(uint8_t *a, uint8_t *b)
{
for (uint8_t i = 0; i < 5; i++)
{ // only compare first 5 bytes
if (a[i] != b[i])
{
return false;
}
}
return true;
}
void loop()
{
uint8_t ap_count_list[] = {0, 0, 0, 0, 0, 0, 0, 0, 0, 0, 0, 0, 0, 0};
int32_t noise_list[] = {RSSI_FLOOR, RSSI_FLOOR, RSSI_FLOOR, RSSI_FLOOR, RSSI_FLOOR, RSSI_FLOOR, RSSI_FLOOR, RSSI_FLOOR, RSSI_FLOOR, RSSI_FLOOR, RSSI_FLOOR, RSSI_FLOOR, RSSI_FLOOR, RSSI_FLOOR};
int32_t peak_list[] = {RSSI_FLOOR, RSSI_FLOOR, RSSI_FLOOR, RSSI_FLOOR, RSSI_FLOOR, RSSI_FLOOR, RSSI_FLOOR, RSSI_FLOOR, RSSI_FLOOR, RSSI_FLOOR, RSSI_FLOOR, RSSI_FLOOR, RSSI_FLOOR, RSSI_FLOOR};
int16_t peak_id_list[] = {-1, -1, -1, -1, -1, -1, -1, -1, -1, -1, -1, -1, -1, -1};
int32_t channel;
int16_t idx;
int32_t rssi;
uint8_t *bssid;
String ssid;
uint16_t color;
int16_t height, offset, text_width;
// WiFi.scanNetworks will return the number of networks found
#if defined(ESP32)
int n = WiFi.scanNetworks(false /* async */, true /* show_hidden */, true /* passive */, 500 /* max_ms_per_chan */);
#else
int n = WiFi.scanNetworks(false /* async */, true /* show_hidden */);
#endif
// clear old graph
gfx->fillRect(0, banner_height, w, h - banner_height, RGB565_BLACK);
gfx->setTextSize(1);
if (n == 0)
{
gfx->setTextColor(RGB565_WHITE);
gfx->setCursor(0, banner_height);
gfx->println("no networks found");
}
else
{
for (int i = 0; i < n; i++)
{
channel = WiFi.channel(i);
idx = channel - 1;
rssi = WiFi.RSSI(i);
bssid = WiFi.BSSID(i);
// channel peak stat
if (peak_list[idx] < rssi)
{
peak_list[idx] = rssi;
peak_id_list[idx] = i;
}
// check signal come from same AP
bool duplicate_SSID = false;
for (int j = 0; j < i; j++)
{
if ((WiFi.channel(j) == channel) && matchBssidPrefix(WiFi.BSSID(j), bssid))
{
duplicate_SSID = true;
break;
}
}
if (!duplicate_SSID)
{
ap_count_list[idx]++;
// noise stat
int32_t noise = rssi - RSSI_FLOOR;
noise *= noise;
if (channel > 4)
{
noise_list[idx - 4] += noise;
}
if (channel > 3)
{
noise_list[idx - 3] += noise;
}
if (channel > 2)
{
noise_list[idx - 2] += noise;
}
if (channel > 1)
{
noise_list[idx - 1] += noise;
}
noise_list[idx] += noise;
if (channel < 14)
{
noise_list[idx + 1] += noise;
}
if (channel < 13)
{
noise_list[idx + 2] += noise;
}
if (channel < 12)
{
noise_list[idx + 3] += noise;
}
if (channel < 11)
{
noise_list[idx + 4] += noise;
}
}
}
// plot found WiFi info
for (int i = 0; i < n; i++)
{
channel = WiFi.channel(i);
idx = channel - 1;
rssi = WiFi.RSSI(i);
color = channel_color[idx];
height = constrain(map(rssi, RSSI_FLOOR, RSSI_CEILING, 1, graph_height), 1, graph_height);
offset = (channel + 1) * channel_width;
// trim rssi with RSSI_FLOOR
if (rssi < RSSI_FLOOR)
{
rssi = RSSI_FLOOR;
}
// plot chart
// gfx->drawLine(offset, graph_baseline - height, offset - signal_width, graph_baseline + 1, color);
// gfx->drawLine(offset, graph_baseline - height, offset + signal_width, graph_baseline + 1, color);
gfx->startWrite();
gfx->writeEllipseHelper(offset, graph_baseline + 1, signal_width, height, 0b0011, color);
gfx->endWrite();
if (i == peak_id_list[idx])
{
// Print SSID, signal strengh and if not encrypted
String ssid = WiFi.SSID(i);
if (ssid.length() == 0)
{
ssid = WiFi.BSSIDstr(i);
}
text_width = (ssid.length() + 6) * 6;
if (text_width > w)
{
offset = 0;
}
else
{
offset -= signal_width;
if ((offset + text_width) > w)
{
offset = w - text_width;
}
}
gfx->setTextColor(color);
gfx->setCursor(offset, graph_baseline - 10 - height);
gfx->print(ssid);
gfx->print('(');
gfx->print(rssi);
gfx->print(')');
#if defined(ESP32)
if (WiFi.encryptionType(i) == WIFI_AUTH_OPEN)
#else
if (WiFi.encryptionType(i) == ENC_TYPE_NONE)
#endif
{
gfx->print('*');
}
}
}
}
// print WiFi stat
gfx->setTextColor(RGB565_WHITE);
gfx->setCursor(0, banner_height);
gfx->print(n);
gfx->print(" networks found, lesser noise channels: ");
bool listed_first_channel = false;
int32_t min_noise = noise_list[0]; // init with channel 1 value
for (channel = 2; channel <= 11; channel++) // channels 12-14 may not available
{
idx = channel - 1;
log_i("min_noise: %d, noise_list[%d]: %d", min_noise, idx, noise_list[idx]);
if (noise_list[idx] < min_noise)
{
min_noise = noise_list[idx];
}
}
for (channel = 1; channel <= 11; channel++) // channels 12-14 may not available
{
idx = channel - 1;
// check channel with min noise
if (noise_list[idx] == min_noise)
{
if (!listed_first_channel)
{
listed_first_channel = true;
}
else
{
gfx->print(", ");
}
gfx->print(channel);
}
}
// draw graph base axle
gfx->drawFastHLine(0, graph_baseline, gfx->width(), RGB565_WHITE);
for (channel = 1; channel <= 14; channel++)
{
idx = channel - 1;
offset = (channel + 1) * channel_width;
gfx->setTextColor(channel_color[idx]);
gfx->setCursor(offset - ((channel < 10) ? 3 : 6), graph_baseline + 2);
gfx->print(channel);
if (ap_count_list[idx] > 0)
{
gfx->setCursor(offset - ((ap_count_list[idx] < 10) ? 9 : 12), graph_baseline + 8 + 2);
gfx->print('{');
gfx->print(ap_count_list[idx]);
gfx->print('}');
}
}
#ifdef CANVAS
gfx->flush();
#endif
// Wait a bit before scanning again
delay(SCAN_INTERVAL);
#if defined(SCAN_COUNT_SLEEP)
// POWER SAVING
if (++scan_count >= SCAN_COUNT_SLEEP)
{
#if defined(LCD_PWR_PIN)
pinMode(LCD_PWR_PIN, INPUT); // disable pin
#endif
#if defined(GFX_BL)
pinMode(GFX_BL, INPUT); // disable pin
#endif
#if defined(ESP32)
esp_sleep_enable_ext0_wakeup(GPIO_NUM_36, LOW);
esp_deep_sleep_start();
#else
ESP.deepSleep(0);
#endif
}
#endif // defined(SCAN_COUNT_SLEEP)
}
运行效果
- 屏幕显示

06_gfx_u8g2_font
- 本示例演示 ESP32-S3-Touch-LCD-1.54 使用 GFX_Library_for_Arduino 库通过加载字库,实现各国文字显示
代码
06_gfx_u8g2_font.ino
#include <U8g2lib.h>
#include <Arduino_GFX_Library.h>
#define GFX_BL 46 // default backlight pin, you may replace DF_GFX_BL to actual backlight pin
/* More data bus class: https://github.com/moononournation/Arduino_GFX/wiki/Data-Bus-Class */
Arduino_DataBus *bus = new Arduino_ESP32SPI(45 /* DC */, 21 /* CS */, 38 /* SCK */, 39 /* MOSI */, GFX_NOT_DEFINED /* MISO */);
/* More display class: https://github.com/moononournation/Arduino_GFX/wiki/Display-Class */
Arduino_GFX *gfx = new Arduino_GC9107(bus, 40 /* RST */, 0 /* rotation */, true /* IPS */);
void setup(void)
{
#ifdef DEV_DEVICE_INIT
DEV_DEVICE_INIT();
#endif
Serial.begin(115200);
// Serial.setDebugOutput(true);
// while(!Serial);
Serial.println("Arduino_GFX U8g2 Font Print UTF8 example");
// Init Display
if (!gfx->begin())
{
Serial.println("gfx->begin() failed!");
}
gfx->fillScreen(RGB565_BLACK);
gfx->setUTF8Print(true); // enable UTF8 support for the Arduino print() function
#ifdef GFX_BL
pinMode(GFX_BL, OUTPUT);
digitalWrite(GFX_BL, HIGH);
#endif
int16_t x1, y1;
uint16_t w, h;
/* U8g2 font list: https://github.com/olikraus/u8g2/wiki/fntlistall */
/* U8g2 Unifont list: https://github.com/olikraus/u8g2/wiki/fntgrpunifont */
gfx->setFont(u8g2_font_unifont_tr);
gfx->setTextColor(RGB565_RED);
gfx->setCursor(0, 16);
// gfx->getTextBounds("Hello World!", 1, 16, &x1, &y1, &w, &h);
// gfx->drawRect(x1 - 1, y1 - 1, w + 2, h + 2, RGB565_RED);
gfx->println("Hello World!");
gfx->setFont(u8g2_font_unifont_t_polish);
gfx->setTextColor(RGB565_YELLOW);
gfx->setCursor(0, 36);
// gfx->getTextBounds("Witaj świecie!", 1, 36, &x1, &y1, &w, &h);
// gfx->drawRect(x1 - 1, y1 - 1, w + 2, h + 2, RGB565_RED);
gfx->println("Witaj świecie!");
gfx->setFont(u8g2_font_unifont_t_vietnamese1);
gfx->setTextColor(RGB565_GREEN);
gfx->setCursor(0, 56);
// gfx->getTextBounds("Chào thế giới!", 1, 56, &x1, &y1, &w, &h);
// gfx->drawRect(x1 - 1, y1 - 1, w + 2, h + 2, RGB565_RED);
gfx->println("Chào thế giới!");
#ifdef U8G2_USE_LARGE_FONTS
gfx->setFont(u8g2_font_unifont_t_chinese2);
gfx->setTextColor(RGB565_CYAN);
gfx->setCursor(0, 76);
// gfx->getTextBounds("世界你好!", 1, 76, &x1, &y1, &w, &h);
// gfx->drawRect(x1 - 1, y1 - 1, w + 2, h + 2, RGB565_RED);
gfx->println("世界你好!");
gfx->setFont(u8g2_font_unifont_t_japanese1);
gfx->setTextColor(RGB565_BLUE);
gfx->setCursor(0, 96);
// gfx->getTextBounds("こんにちは世界!", 1, 96, &x1, &y1, &w, &h);
// gfx->drawRect(x1 - 1, y1 - 1, w + 2, h + 2, RGB565_RED);
gfx->println("こんにちは世界!");
gfx->setFont(u8g2_font_unifont_t_korean1);
gfx->setTextColor(RGB565_MAGENTA);
gfx->setCursor(0, 116);
// gfx->getTextBounds("안녕하세요, 세계입니다!", 1, 116, &x1, &y1, &w, &h);
// gfx->drawRect(x1 - 1, y1 - 1, w + 2, h + 2, RGB565_RED);
gfx->println("안녕하세요, 세계입니다!");
#endif // U8G2_USE_LARGE_FONTS
}
void loop()
{
}
运行效果
- 屏幕显示

07_sd_card_test
- 本示例使用 ESP32-S3-Touch-LCD-1.54 测试 SD 卡的读写功能
代码
07_sd_card_test.ino
#include "FS.h"
#include "SD_MMC.h"
int clk = 16;
int cmd = 15;
int d0 = 17;
int d1 = 18;
int d2 = 13;
int d3 = 14;
void listDir(fs::FS &fs, const char *dirname, uint8_t levels) {
Serial.printf("Listing directory: %s\n", dirname);
File root = fs.open(dirname);
if (!root) {
Serial.println("Failed to open directory");
return;
}
if (!root.isDirectory()) {
Serial.println("Not a directory");
return;
}
File file = root.openNextFile();
while (file) {
if (file.isDirectory()) {
Serial.print(" DIR : ");
Serial.println(file.name());
if (levels) {
listDir(fs, file.path(), levels - 1);
}
} else {
Serial.print(" FILE: ");
Serial.print(file.name());
Serial.print(" SIZE: ");
Serial.println(file.size());
}
file = root.openNextFile();
}
}
void createDir(fs::FS &fs, const char *path) {
Serial.printf("Creating Dir: %s\n", path);
if (fs.mkdir(path)) {
Serial.println("Dir created");
} else {
Serial.println("mkdir failed");
}
}
void removeDir(fs::FS &fs, const char *path) {
Serial.printf("Removing Dir: %s\n", path);
if (fs.rmdir(path)) {
Serial.println("Dir removed");
} else {
Serial.println("rmdir failed");
}
}
void readFile(fs::FS &fs, const char *path) {
Serial.printf("Reading file: %s\n", path);
File file = fs.open(path);
if (!file) {
Serial.println("Failed to open file for reading");
return;
}
Serial.print("Read from file: ");
while (file.available()) {
Serial.write(file.read());
}
}
void writeFile(fs::FS &fs, const char *path, const char *message) {
Serial.printf("Writing file: %s\n", path);
File file = fs.open(path, FILE_WRITE);
if (!file) {
Serial.println("Failed to open file for writing");
return;
}
if (file.print(message)) {
Serial.println("File written");
} else {
Serial.println("Write failed");
}
}
void appendFile(fs::FS &fs, const char *path, const char *message) {
Serial.printf("Appending to file: %s\n", path);
File file = fs.open(path, FILE_APPEND);
if (!file) {
Serial.println("Failed to open file for appending");
return;
}
if (file.print(message)) {
Serial.println("Message appended");
} else {
Serial.println("Append failed");
}
}
void renameFile(fs::FS &fs, const char *path1, const char *path2) {
Serial.printf("Renaming file %s to %s\n", path1, path2);
if (fs.rename(path1, path2)) {
Serial.println("File renamed");
} else {
Serial.println("Rename failed");
}
}
void deleteFile(fs::FS &fs, const char *path) {
Serial.printf("Deleting file: %s\n", path);
if (fs.remove(path)) {
Serial.println("File deleted");
} else {
Serial.println("Delete failed");
}
}
void testFileIO(fs::FS &fs, const char *path) {
File file = fs.open(path);
static uint8_t buf[512];
size_t len = 0;
uint32_t start = millis();
uint32_t end = start;
if (file) {
len = file.size();
size_t flen = len;
start = millis();
while (len) {
size_t toRead = len;
if (toRead > 512) {
toRead = 512;
}
file.read(buf, toRead);
len -= toRead;
}
end = millis() - start;
Serial.printf("%u bytes read for %lu ms\n", flen, end);
file.close();
} else {
Serial.println("Failed to open file for reading");
}
file = fs.open(path, FILE_WRITE);
if (!file) {
Serial.println("Failed to open file for writing");
return;
}
size_t i;
start = millis();
for (i = 0; i < 2048; i++) {
file.write(buf, 512);
}
end = millis() - start;
Serial.printf("%u bytes written for %lu ms\n", 2048 * 512, end);
file.close();
}
void setup() {
Serial.begin(115200);
delay(3000);
  if (!SD_MMC.setPins(clk, cmd, d0, d1, d2, d3)) {
  Serial.println("Pin change failed!");
  return;
}
if (!SD_MMC.begin()) {
  Serial.println("Card Mount Failed");
  return;
}
uint8_t cardType = SD_MMC.cardType();
if (cardType == CARD_NONE) {
Serial.println("No SD_MMC card attached");
return;
}
Serial.print("SD_MMC Card Type: ");
if (cardType == CARD_MMC) {
Serial.println("MMC");
} else if (cardType == CARD_SD) {
Serial.println("SDSC");
} else if (cardType == CARD_SDHC) {
Serial.println("SDHC");
} else {
Serial.println("UNKNOWN");
}
uint64_t cardSize = SD_MMC.cardSize() / (1024 * 1024);
Serial.printf("SD_MMC Card Size: %lluMB\n", cardSize);
listDir(SD_MMC, "/", 0);
createDir(SD_MMC, "/mydir");
listDir(SD_MMC, "/", 0);
removeDir(SD_MMC, "/mydir");
listDir(SD_MMC, "/", 2);
writeFile(SD_MMC, "/hello.txt", "Hello ");
appendFile(SD_MMC, "/hello.txt", "World!\n");
readFile(SD_MMC, "/hello.txt");
deleteFile(SD_MMC, "/foo.txt");
renameFile(SD_MMC, "/hello.txt", "/foo.txt");
readFile(SD_MMC, "/foo.txt");
testFileIO(SD_MMC, "/test.txt");
Serial.printf("Total space: %lluMB\n", SD_MMC.totalBytes() / (1024 * 1024));
Serial.printf("Used space: %lluMB\n", SD_MMC.usedBytes() / (1024 * 1024));
}
void loop() {
delay(10);
}
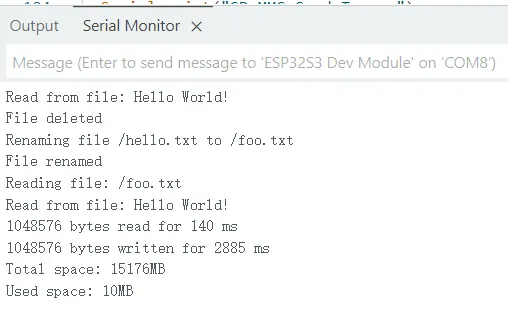
代码解释
-
SD 卡初始化 :
if (!SD_MMC.setPins(clk, cmd, d0, d1, d2, d3)) {Serial.println("Pin change failed!");return;}if (!SD_MMC.begin()) {Serial.println("Card Mount Failed");return;}
运行效果
- 屏幕无现象
- 打开串口监视器
08_lvgl_example_v8
本示例演示了使用 ESP32-S3-Touch-LCD-1.54 运行 lvgl(v8.4.0)示例程序。
需要安装 lvgl v8.4.0 版本,如已安装其他版本,请重新安装。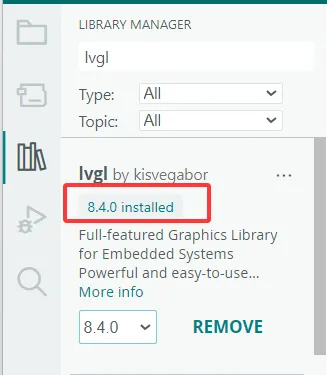
代码
08_lvgl_example_v8.ino
/*Using LVGL with Arduino requires some extra steps:
 *Be sure to read the docs here: https://lvgl.io/docs/open/integration/frameworks/arduino  */

#include <lvgl.h>

/*To use the built-in examples and demos of LVGL uncomment the includes below respectively.
 *You also need to copy `lvgl/examples` to `lvgl/src/examples`. Similarly for the demos `lvgl/demos` to `lvgl/src/demos`.
 Note that the `lv_examples` library is for LVGL v7 and you shouldn't install it for this version (since LVGL v8)
 as the examples and demos are now part of the main LVGL library. */

// #include <examples/lv_examples.h>
// #include <demos/lv_demos.h>

// #define DIRECT_MODE // Uncomment to enable full frame buffer

#include <Arduino_GFX_Library.h>

#define GFX_BL 46 // default backlight pin, you may replace DF_GFX_BL to actual backlight pin

/* More data bus class: https://github.com/moononournation/Arduino_GFX/wiki/Data-Bus-Class */
Arduino_DataBus *bus = new Arduino_ESP32SPI(45 /* DC */, 21 /* CS */, 38 /* SCK */, 39 /* MOSI */, GFX_NOT_DEFINED /* MISO */);

/* More display class: https://github.com/moononournation/Arduino_GFX/wiki/Display-Class */
Arduino_GFX *gfx = new Arduino_GC9107(bus, 40 /* RST */, 0 /* rotation */, true /* IPS */);

uint32_t screenWidth;
uint32_t screenHeight;
uint32_t bufSize;
lv_disp_draw_buf_t draw_buf;
lv_color_t *disp_draw_buf1;
lv_color_t *disp_draw_buf2;
lv_disp_drv_t disp_drv;

/* Display flushing */
void my_disp_flush(lv_disp_drv_t *disp_drv, const lv_area_t *area, lv_color_t *color_p) {
  uint32_t w = (area->x2 - area->x1 + 1);
  uint32_t h = (area->y2 - area->y1 + 1);

#if (LV_COLOR_16_SWAP != 0)
  gfx->draw16bitBeRGBBitmap(area->x1, area->y1, (uint16_t *)&color_p->full, w, h);
#else
  gfx->draw16bitRGBBitmap(area->x1, area->y1, (uint16_t *)&color_p->full, w, h);
#endif

  lv_disp_flush_ready(disp_drv);
}

void setup() {

  Serial.begin(115200);
  Serial.println("Arduino_GFX Hello World example");

  // Init Display
  if (!gfx->begin()) {
    Serial.println("gfx->begin() failed!");
  }

  gfx->fillScreen(RGB565_BLACK);

#ifdef GFX_BL
  pinMode(GFX_BL, OUTPUT);
  digitalWrite(GFX_BL, HIGH);
#endif

  lv_init();

  screenWidth = gfx->width();
  screenHeight = gfx->height();

  bufSize = screenWidth * 120;

  disp_draw_buf1 = (lv_color_t *)heap_caps_malloc(bufSize * 2, MALLOC_CAP_DEFAULT | MALLOC_CAP_8BIT);

  disp_draw_buf2 = (lv_color_t *)heap_caps_malloc(bufSize * 2, MALLOC_CAP_DEFAULT | MALLOC_CAP_8BIT);

  lv_disp_draw_buf_init(&draw_buf, disp_draw_buf1, disp_draw_buf2, bufSize);

  /* Initialize the display */
  lv_disp_drv_init(&disp_drv);
  /* Change the following line to your display resolution */
  disp_drv.hor_res = screenWidth;
  disp_drv.ver_res = screenHeight;
  disp_drv.flush_cb = my_disp_flush;
  disp_drv.draw_buf = &draw_buf;

  lv_disp_drv_register(&disp_drv);

  /* Initialize the (dummy) input device driver */
  lv_obj_t *label = lv_label_create(lv_scr_act());
  lv_label_set_text(label, "Hello Arduino!\n (V" GFX_STR(LVGL_VERSION_MAJOR) "." GFX_STR(LVGL_VERSION_MINOR) "." GFX_STR(LVGL_VERSION_PATCH) ")");
  lv_obj_align(label, LV_ALIGN_CENTER, 0, 0);

  /* Option 3: Or try out a demo. Don't forget to enable the demos in lv_conf.h. E.g. LV_USE_DEMOS_WIDGETS*/
  // lv_demo_widgets();
  // lv_demo_benchmark();
  // lv_demo_keypad_encoder();
  // lv_demo_music();
  // lv_demo_stress();

  Serial.println("Setup done");
}

void loop() {
  lv_timer_handler(); /* let the GUI do its work */
  delay(1);
}
运行效果
- 屏幕显示

09_lvgl_example_v9
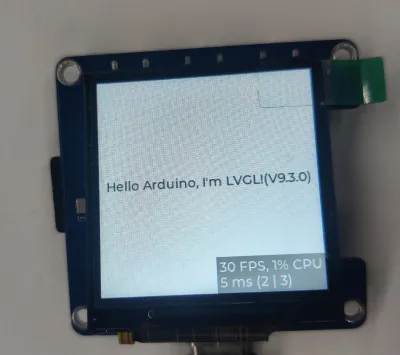
本示例演示了使用 ESP32-S3-Touch-LCD-1.54 运行 lvgl(v9.3.0)示例程序。
需要安装 lvgl v9.3.0 版本,如已安装其他版本,请重新安装。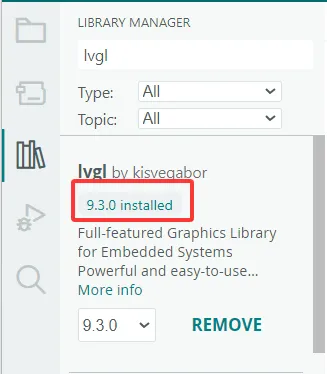
代码
09_lvgl_example_v9.ino
/*Using LVGL with Arduino requires some extra steps:
 *Be sure to read the docs here: https://lvgl.io/docs/open/integration/frameworks/arduino  */

#include <lvgl.h>

/*To use the built-in examples and demos of LVGL uncomment the includes below respectively.
 *You also need to copy `lvgl/examples` to `lvgl/src/examples`. Similarly for the demos `lvgl/demos` to `lvgl/src/demos`.
 *Note that the `lv_examples` library is for LVGL v7 and you shouldn't install it for this version (since LVGL v8)
 *as the examples and demos are now part of the main LVGL library. */

// #include <examples/lv_examples.h>
// #include <demos/lv_demos.h>

// #define DIRECT_RENDER_MODE // Uncomment to enable full frame buffer

#include <Arduino_GFX_Library.h>

#define GFX_BL 46 // default backlight pin, you may replace DF_GFX_BL to actual backlight pin

/* More data bus class: https://github.com/moononournation/Arduino_GFX/wiki/Data-Bus-Class */
Arduino_DataBus *bus = new Arduino_ESP32SPI(45 /* DC */, 21 /* CS */, 38 /* SCK */, 39 /* MOSI */, GFX_NOT_DEFINED /* MISO */);

/* More display class: https://github.com/moononournation/Arduino_GFX/wiki/Display-Class */
Arduino_GFX *gfx = new Arduino_GC9107(bus, 40 /* RST */, 0 /* rotation */, true /* IPS */);

uint32_t screenWidth;
uint32_t screenHeight;
uint32_t bufSize;
lv_display_t *disp;
lv_color_t *disp_draw_buf;

#if LV_USE_LOG != 0
void my_print(lv_log_level_t level, const char *buf)
{
  LV_UNUSED(level);
  Serial.println(buf);
  Serial.flush();
}
#endif

uint32_t millis_cb(void)
{
  return millis();
}

/* LVGL calls it when a rendered image needs to copied to the display*/
void my_disp_flush(lv_display_t *disp, const lv_area_t *area, uint8_t *px_map)
{
#ifndef DIRECT_RENDER_MODE
  uint32_t w = lv_area_get_width(area);
  uint32_t h = lv_area_get_height(area);

  gfx->draw16bitRGBBitmap(area->x1, area->y1, (uint16_t *)px_map, w, h);
#endif // #ifndef DIRECT_RENDER_MODE

  /*Call it to tell LVGL you are ready*/
  lv_disp_flush_ready(disp);
}

void setup()
{
#ifdef DEV_DEVICE_INIT
  DEV_DEVICE_INIT();
#endif

  Serial.begin(115200);
  // Serial.setDebugOutput(true);
  // while(!Serial);
  Serial.println("Arduino_GFX LVGL_Arduino_v9 example ");
  String LVGL_Arduino = String('V') + lv_version_major() + "." + lv_version_minor() + "." + lv_version_patch();
  Serial.println(LVGL_Arduino);

  // Init Display
  if (!gfx->begin())
  {
    Serial.println("gfx->begin() failed!");
  }
  gfx->fillScreen(RGB565_BLACK);

#ifdef GFX_BL
  pinMode(GFX_BL, OUTPUT);
  digitalWrite(GFX_BL, HIGH);
#endif

  lv_init();

  /*Set a tick source so that LVGL will know how much time elapsed. */
  lv_tick_set_cb(millis_cb);

  /* register print function for debugging */
#if LV_USE_LOG != 0
  lv_log_register_print_cb(my_print);
#endif

  screenWidth = gfx->width();
  screenHeight = gfx->height();

#ifdef DIRECT_RENDER_MODE
  bufSize = screenWidth * screenHeight;
#else
  bufSize = screenWidth * 120;
#endif

  disp_draw_buf = (lv_color_t *)heap_caps_malloc(bufSize * 2, MALLOC_CAP_INTERNAL | MALLOC_CAP_8BIT);
  if (!disp_draw_buf)
  {
    // remove MALLOC_CAP_INTERNAL flag try again
    disp_draw_buf = (lv_color_t *)heap_caps_malloc(bufSize * 2, MALLOC_CAP_8BIT);
  }

  if (!disp_draw_buf)
  {
    Serial.println("LVGL disp_draw_buf allocate failed!");
  }
  else
  {
    disp = lv_display_create(screenWidth, screenHeight);
    lv_display_set_flush_cb(disp, my_disp_flush);
#ifdef DIRECT_RENDER_MODE
    lv_display_set_buffers(disp, disp_draw_buf, NULL, bufSize * 2, LV_DISPLAY_RENDER_MODE_DIRECT);
#else
    lv_display_set_buffers(disp, disp_draw_buf, NULL, bufSize * 2, LV_DISPLAY_RENDER_MODE_PARTIAL);
#endif

    /*Initialize the (dummy) input device driver*/
    // lv_indev_t *indev = lv_indev_create();
    // lv_indev_set_type(indev, LV_INDEV_TYPE_POINTER); /*Touchpad should have POINTER type*/
    // lv_indev_set_read_cb(indev, my_touchpad_read);

    /* Option 1: Create a simple label
     * ---------------------
     */
    lv_obj_t *label = lv_label_create(lv_scr_act());
    lv_label_set_text(label, "Hello Arduino, \nI'm LVGL!(V" GFX_STR(LVGL_VERSION_MAJOR) "." GFX_STR(LVGL_VERSION_MINOR) "." GFX_STR(LVGL_VERSION_PATCH) ")");
    lv_obj_align(label, LV_ALIGN_CENTER, 0, 0);

    /* Option 2: Try an example. See all the examples
     *  - Online: https://docs.lvgl.io/master/examples.html
     *  - Source codes: https://github.com/lvgl/lvgl/tree/master/examples
     * ----------------------------------------------------------------
     */
    // lv_example_btn_1();

    /* Option 3: Or try out a demo. Don't forget to enable the demos in lv_conf.h. E.g. LV_USE_DEMOS_WIDGETS
     * -------------------------------------------------------------------------------------------
     */
    // lv_demo_widgets();
    // lv_demo_benchmark();
    // lv_demo_keypad_encoder();
    // lv_demo_music();
    // lv_demo_stress();
  }

  Serial.println("Setup done");
}

void loop()
{
  lv_task_handler(); /* let the GUI do its work */
  delay(5);
}
运行效果
- 屏幕显示
10_esp_sr
本示例演示了使用 ESP32-S3-LCD-1.54 运行 ESP_SR 示例程序。
准备工作
- Arduino 工程参数设置,Partition Scheme: "ESP SR 16M (3MB APP/7MB SPIFFS/2.9MB MODEL)"
代码
10_esp_sr.ino
#include "ESP_I2S.h"
#include "ESP_SR.h"
#include "es7210.h"
#include "esp_log.h"
#include "esp_check.h"
#include "Wire.h"

#define I2S_PIN_MCK 8
#define I2S_PIN_BCK 9
#define I2S_PIN_WS 10
#define I2S_PIN_DIN 11
#define I2S_PIN_DOUT 12
#define I2C_PIN_SDA 42
#define I2C_PIN_SCL 41

#define ES7210_I2C_ADDR (0x40)
#define ES7210_SAMPLE_RATE (16000)
#define ES7210_I2S_FORMAT ES7210_I2S_FMT_I2S
#define ES7210_MCLK_MULTIPLE (256)
#define ES7210_BIT_WIDTH ES7210_I2S_BITS_16B
#define ES7210_MIC_BIAS ES7210_MIC_BIAS_2V87
#define ES7210_MIC_GAIN ES7210_MIC_GAIN_30DB
#define ES7210_ADC_VOLUME (40)
static es7210_dev_handle_t es7210_handle = NULL;

I2SClass i2s;

// Generated using the following command:
// python3 tools/gen_sr_commands.py "Turn on the light,Switch on the light;Turn off the light,Switch off the light,Go dark;Start fan;Stop fan"
enum {
  SR_CMD_TURN_ON_THE_LIGHT,
  SR_CMD_TURN_OFF_THE_LIGHT,
  SR_CMD_START_FAN,
  SR_CMD_STOP_FAN,
};
static const sr_cmd_t sr_commands[] = {
  { 0, "Turn on the light", "TkN nN jc LiT" },
  { 0, "Switch on the light", "SWgp nN jc LiT" },
  { 1, "Turn off the light", "TkN eF jc LiT" },
  { 1, "Switch off the light", "SWgp eF jc LiT" },
  { 1, "Go dark", "Gb DnRK" },
  { 2, "Start fan", "STnRT FaN" },
  { 3, "Stop fan", "STnP FaN" },
};

void onSrEvent(sr_event_t event, int command_id, int phrase_id) {
  switch (event) {
    case SR_EVENT_WAKEWORD: Serial.println("WakeWord Detected!"); break;
    case SR_EVENT_WAKEWORD_CHANNEL:
      Serial.printf("WakeWord Channel %d Verified!\n", command_id);
      ESP_SR.setMode(SR_MODE_COMMAND);  // Switch to Command detection
      break;
    case SR_EVENT_TIMEOUT:
      Serial.println("Timeout Detected!");
      ESP_SR.setMode(SR_MODE_WAKEWORD);  // Switch back to WakeWord detection
      break;
    case SR_EVENT_COMMAND:
      Serial.printf("Command %d Detected! %s\n", command_id, sr_commands[phrase_id].str);
      // switch (command_id) {
      //   case SR_CMD_TURN_ON_THE_LIGHT: digitalWrite(LIGHT_PIN, HIGH); break;
      //   case SR_CMD_TURN_OFF_THE_LIGHT: digitalWrite(LIGHT_PIN, LOW); break;
      //   case SR_CMD_START_FAN: digitalWrite(FAN_PIN, HIGH); break;
      //   case SR_CMD_STOP_FAN: digitalWrite(FAN_PIN, LOW); break;
      //   default: Serial.println("Unknown Command!"); break;
      // }
      ESP_SR.setMode(SR_MODE_COMMAND);  // Allow for more commands to be given, before timeout
      // ESP_SR.setMode(SR_MODE_WAKEWORD); // Switch back to WakeWord detection
      break;
    default: Serial.println("Unknown Event!"); break;
  }
}

void es7210_init(void) {

  /* Create ES7210 device handle */
  es7210_i2c_config_t es7210_i2c_conf = {
    // .i2c_port = I2C_MASTER_NUM,
    .i2c_addr = ES7210_I2C_ADDR
  };
  ESP_ERROR_CHECK(es7210_new_codec(&es7210_i2c_conf, &es7210_handle));

  es7210_codec_config_t codec_conf = {};
  codec_conf.i2s_format = ES7210_I2S_FORMAT;
  codec_conf.mclk_ratio = ES7210_MCLK_MULTIPLE;
  codec_conf.sample_rate_hz = ES7210_SAMPLE_RATE;
  codec_conf.bit_width = ES7210_BIT_WIDTH;
  codec_conf.mic_bias = ES7210_MIC_BIAS;
  codec_conf.mic_gain = ES7210_MIC_GAIN;
  codec_conf.flags.tdm_enable = false;
  ESP_ERROR_CHECK(es7210_config_codec(es7210_handle, &codec_conf));
  ESP_ERROR_CHECK(es7210_config_volume(es7210_handle, ES7210_ADC_VOLUME));
}

void setup() {
  Serial.begin(115200);
  Wire.begin(I2C_PIN_SDA, I2C_PIN_SCL);
  es7210_init();
  i2s.setPins(I2S_PIN_BCK, I2S_PIN_WS, I2S_PIN_DOUT, I2S_PIN_DIN, I2S_PIN_MCK);
  i2s.setTimeout(1000);
  i2s.begin(I2S_MODE_STD, 16000, I2S_DATA_BIT_WIDTH_16BIT, I2S_SLOT_MODE_STEREO);

  ESP_SR.onEvent(onSrEvent);
  ESP_SR.begin(i2s, sr_commands, sizeof(sr_commands) / sizeof(sr_cmd_t), SR_CHANNELS_STEREO, SR_MODE_WAKEWORD);
}

void loop() {}
代码解释
-
初始化 ES7210 以及 I2S 接口
Wire.begin(I2C_PIN_SDA, I2C_PIN_SCL);es7210_init();i2s.setPins(I2S_PIN_BCK, I2S_PIN_WS, I2S_PIN_DOUT, I2S_PIN_DIN, I2S_PIN_MCK);i2s.setTimeout(1000);i2s.begin(I2S_MODE_STD, 16000, I2S_DATA_BIT_WIDTH_16BIT, I2S_SLOT_MODE_STEREO); -
初始化 ESP_SR
ESP_SR.onEvent(onSrEvent);ESP_SR.begin(i2s, sr_commands, sizeof(sr_commands) / sizeof(sr_cmd_t), SR_CHANNELS_STEREO, SR_MODE_WAKEWORD); -
语音识别指令设置,生成语音控制指令
static const sr_cmd_t sr_commands[] = {{ 0, "Turn on the light", "TkN nN jc LiT" },{ 0, "Switch on the light", "SWgp nN jc LiT" },{ 1, "Turn off the light", "TkN eF jc LiT" },{ 1, "Switch off the light", "SWgp eF jc LiT" },{ 1, "Go dark", "Gb DnRK" },{ 2, "Start fan", "STnRT FaN" },{ 3, "Stop fan", "STnP FaN" },};
运行效果
- 设备唤醒词为 “Hi ESP”
- 唤醒后可通过语音识别指令进行操作
