网络天气显示
重要提示:关于开发板的兼容性
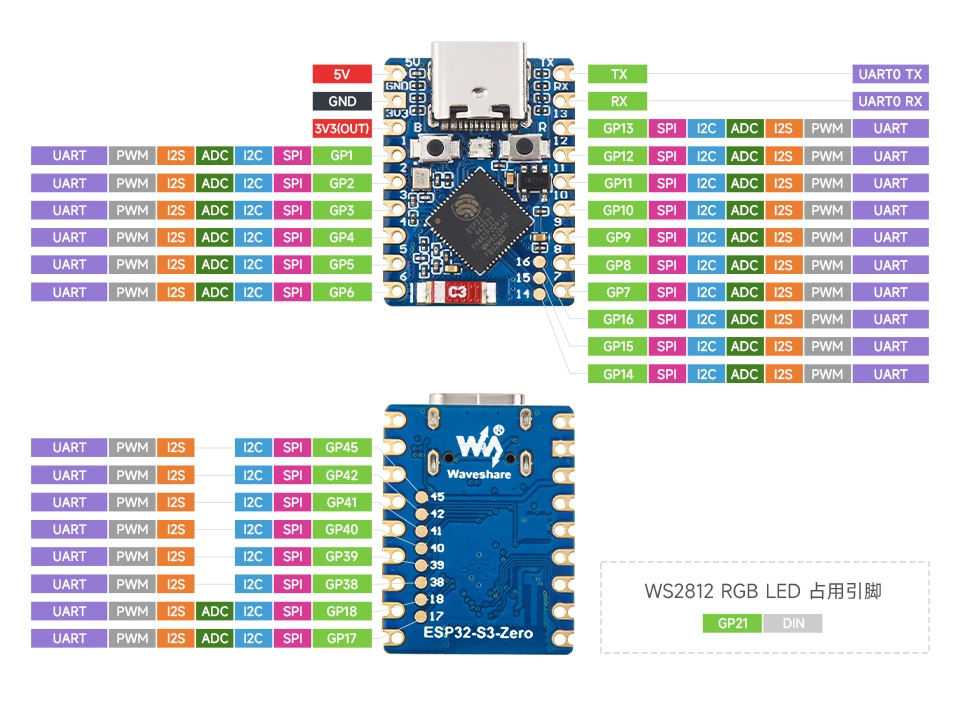
本教程的核心逻辑适用于所有 ESP32 开发板,但所有操作步骤均以 微雪 ESP32-S3-Zero 迷你开发板 为例进行讲解。如果您使用其他型号的开发板,请根据实际情况修改相应设置。
项目介绍
本项目将展示如何利用 ESP32 制作一个网络天气显示器。通过连接 Wi-Fi 网络,ESP32 将定期从 心知天气 API 获取指定城市的实时天气数据(天气现象和温度),并将这些信息显示在微雪 1.5 寸 OLED 屏幕上。
硬件连接
需要使用的器件有:
- 微雪 1.5 寸 OLED 模块 * 1
- 面包板 * 1
- 导线
- ESP32 开发板
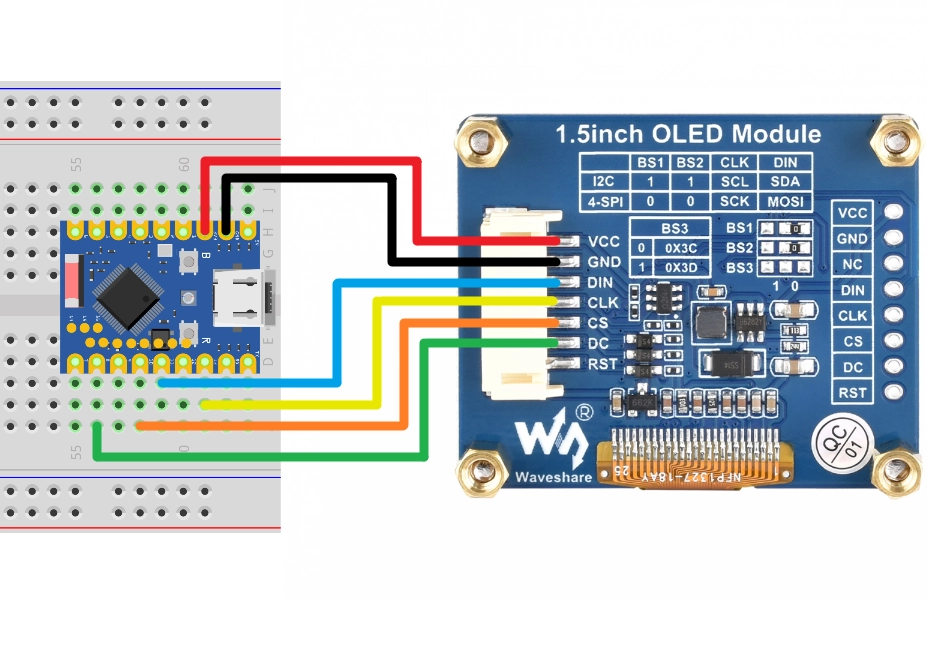
按照下面接线图连接电路:
ESP32-S3-Zero 引脚图
提示
以下用 SPI 接口连接 OLED 显示屏,此屏幕也支持 I2C,通过 BS1 和 BS2 控制,如果使用 I2C 模式,请参考 第7节 I2C 通信 中的接线方式。
| ESP32 引脚 | OLED 模块 | 说明 |
|---|---|---|
| GPIO 13 | SCK | SPI 时钟线 |
| GPIO 11 | MOSI | SPI 数据输出 |
| GPIO 10 | CS | 片选信号 |
| GPIO 8 | DC | 数据/命令选择 |
| 3.3V | VCC | 电源正极 |
| GND | GND | 电源负极 |
代码实现
提示
此代码示例依赖以下库,请在 Arduino IDE 的库管理器中安装:
- Adafruit SSD1327 (用于驱动 OLED 屏幕)
- Adafruit GFX Library (图形核心库)
- ArduinoJson (用于解析 JSON 数据)
/*
  WiFi 天气显示器

  此示例展示了如何连接 WiFi,通过 HTTP 获取 JSON 格式的天气数据,
  并在 SSD1327 OLED 屏幕上显示。

  API 服务商: 心知天气 (Seniverse)

  电路连接:
  - OLED SCK  -> GPIO 13
  - OLED MOSI -> GPIO 11
  - OLED CS   -> GPIO 10
  - OLED DC   -> GPIO 8

  Wulu (Waveshare Team)
*/

#include <WiFi.h>
#include <HTTPClient.h>
#include <ArduinoJson.h>
#include <Adafruit_GFX.h>
#include <Adafruit_SSD1327.h>

// Wi-Fi 配置 (请替换为你的 WiFi)
const char* ssid = "Maker";
const char* password = "12345678";

// 心知天气 API 配置 (请替换为你的私钥)
String apiKey = "your_api_key";
// 你想查询天气的城市
String location = "shenzhen";

// API URL 模板
const String apiUrlTemplate = "https://api.seniverse.com/v3/weather/now.json?key=%s&location=%s&language=en&unit=c";

// 更新间隔: 30 分钟 (毫秒)
const unsigned long updateInterval = 1800000;
unsigned long lastUpdateTime = 0;

// SPI 引脚配置
const int SCK_PIN = 13;
const int MOSI_PIN = 11;
const int CS_PIN = 10;
const int DC_PIN = 8;

// 初始化 OLED (SPI)
// 128x128 分辨率
Adafruit_SSD1327 display(128, 128, &SPI, DC_PIN, -1, CS_PIN);

// 若使用 I2C,请使用以下构造函数(需确认 I2C 地址,通常为 0x3D)
// const int SDA_PIN = 2;
// const int SCL_PIN = 1;
// Adafruit_SSD1327 display(128, 128, &Wire, -1); // -1 表示无复位引脚

void setup() {
  Serial.begin(115200);

  // Wire.begin(SDA_PIN, SCL_PIN);

  // 初始化 OLED (I2C)
  // if (!display.begin(0x3D)) {
  //   Serial.println("Unable to initialize OLED");
  //   while (true) yield();
  // }

  SPI.begin(SCK_PIN, -1, MOSI_PIN, CS_PIN);

  // 初始化 OLED
  if (!display.begin()) {
    Serial.println("Unable to initialize OLED");
    while (true) yield();
  }

  // 设置文本大小和颜色
  display.setTextSize(1);
  display.setTextColor(SSD1327_WHITE);
  display.clearDisplay();
  display.display();

  connectWiFi();

  // 首次获取天气
  getWeather();
  lastUpdateTime = millis();
}

void loop() {
  // 定时更新
  if (millis() - lastUpdateTime >= updateInterval) {
    getWeather();
    lastUpdateTime = millis();
  }
}

void connectWiFi() {
  // 连接 WiFi
  WiFi.mode(WIFI_STA);
  WiFi.begin(ssid, password);
  Serial.print("Connecting to WiFi");

  display.clearDisplay();
  display.setCursor(5, 20);
  display.print("Connecting to");
  display.setCursor(5, 40);
  display.print("WiFi...");
  display.display();

  while (WiFi.status() != WL_CONNECTED) {
    delay(500);
    Serial.print(".");
  }

  Serial.println("\nConnected!");
  Serial.print("IP Address: ");
  Serial.println(WiFi.localIP());

  display.clearDisplay();
  display.setCursor(5, 20);
  display.print("WiFi Connected!");
  display.setCursor(5, 40);
  display.print("IP:");
  display.setCursor(5, 55);
  display.print(WiFi.localIP());
  display.display();
  delay(2000);
}

void displayWeather(String city, String weather, String temperature) {
  display.clearDisplay();
  display.setTextSize(1);
  display.setTextColor(SSD1327_WHITE);

  // 城市名称
  display.setCursor(5, 10);
  display.print("City: ");
  display.println(city);

  // 天气状况
  display.setCursor(5, 40);
  display.println("Weather:");
  display.setCursor(5, 55);
  display.println(weather);

  // 温度
  display.setCursor(5, 85);
  display.print("Temp: ");
  display.print(temperature);
  display.println(" C");

  display.display();
  Serial.printf("Display updated: %s, %s, %s C\n", city.c_str(), weather.c_str(), temperature.c_str());
}

void getWeather() {
  if (WiFi.status() == WL_CONNECTED) {
    HTTPClient http;

    // 构建完整的请求 URL
    char url[200];
    sprintf(url, apiUrlTemplate.c_str(), apiKey.c_str(), location.c_str());

    Serial.print("Fetching weather from: ");
    Serial.println(url);

    display.clearDisplay();
    display.setCursor(5, 20);
    display.print("Fetching...");
    display.display();

    http.begin(url);
    int httpCode = http.GET();

    if (httpCode > 0) {
      if (httpCode == HTTP_CODE_OK) {
        String payload = http.getString();
        Serial.println("API Response:");
        Serial.println(payload);

        // 解析 JSON
        JsonDocument doc;
        DeserializationError error = deserializeJson(doc, payload);

        if (!error) {
          JsonObject result = doc["results"][0];
          String locationName = result["location"]["name"].as<String>();
          String weatherText = result["now"]["text"].as<String>();
          String temperature = result["now"]["temperature"].as<String>();

          displayWeather(locationName, weatherText, temperature);
        } else {
          Serial.print("deserializeJson() failed: ");
          Serial.println(error.c_str());
          displayWeather("Error", "JSON Fail", "");
        }
      } else {
        Serial.println("API Error: " + http.getString());
      }
    } else {
      Serial.printf("HTTP GET failed, error: %s\n", http.errorToString(httpCode).c_str());
      displayWeather("Error", "HTTP Fail", "");
    }
    http.end();
  } else {
    Serial.println("WiFi Disconnected");
    // 尝试重连
    connectWiFi();
  }
}
代码解释
-
导入库:
WiFi.h:ESP32 的 Wi-Fi 库,用于连接网络。HTTPClient.h:用于发送 HTTP 请求。ArduinoJson.h:强大的 JSON 解析库,用于处理 API 返回的数据。Adafruit_GFX.h和Adafruit_SSD1327.h:Adafruit 提供的图形库和 SSD1327 驱动库,用于控制 OLED 显示屏。
-
配置参数:
ssid和password:Wi-Fi 连接信息。apiKey和location:心知天气的 API 密钥和城市设置。SCK_PIN,MOSI_PIN等:定义了 SPI 接口的引脚连接。
-
对象初始化:
Adafruit_SSD1327 display(...):创建显示屏对象。这里使用了 硬件 SPI 模式(传入&SPI),并在setup()函数中通过SPI.begin(SCK_PIN, -1, MOSI_PIN, CS_PIN)自定义了 SPI 引脚映射。若需使用 I2C 模式,可参考代码中的注释部分进行修改。
-
connectWiFi()函数:- 使用
WiFi.begin()启动连接。 WiFi.status()检查连接状态,直到连接成功。- 在屏幕上实时显示连接进度和获取到的 IP 地址。
- 使用
-
getWeather()函数:- 构建 API 请求 URL。
- 使用
http.GET()发送请求。 - 接收响应后,使用
deserializeJson()解析 JSON 数据。 - 提取
location,text(天气现象),temperature等字段。 - 调用
displayWeather()更新显示。
-
displayWeather()函数:- 使用
display.clearDisplay()清除屏幕。 - 使用
display.setCursor()和display.print()在指定位置显示文本信息。 display.display()将缓冲区的内容发送到屏幕显示。
- 使用
-
loop()函数:- 使用
millis()进行非阻塞延时,每隔 30 分钟(updateInterval)调用一次getWeather()更新天气信息。
- 使用